Published on : 19 January 2026
How to Pack Kitchen for Moving: The Ultimate UK Guide
Of all the rooms in the house, the kitchen is the one that fills most people with dread when it comes to packing. It’s a space crammed with fragile items, awkward appliances, and things you’re still using right up until the last minute. The only way to tackle it is to start early and break the job down into manageable chunks. Trust me, a solid plan that kicks off about four weeks before you move will turn potential chaos into a smooth, organised process.
Your Pre-Packing Blueprint for a Smooth Kitchen Move
The secret to a stress-free kitchen move has nothing to do with speed and everything to do with strategy. By creating a clear blueprint before the first box is even taped up, you’re setting yourself up for success. This preparation phase is your chance to get properly organised, seriously reduce the amount of stuff you have to move, and gather the right tools for the job.
Begin with a Purposeful Sort and Declutter
Before you even think about reaching for the packing paper, take a long, hard look at everything in your kitchen. Moving is the perfect opportunity to get rid of things you no longer need, which will save you time, money, and valuable box space. Think of it as a kitchen audit.
Go through your cupboards, drawers, and pantry with three simple categories in mind: keep, donate, and discard.
- Keep: These are the items you genuinely love and use on a regular basis. Set them aside for packing.
- Donate: What about that unused bread maker or the extra set of mugs you bought on a whim? If they’re in good nick, a local charity shop or food bank would be thrilled to have them.
- Discard: Be ruthless. Chipped plates, expired spices, and broken utensils have no place in your new home. There’s simply no point in moving clutter.
This single step can massively reduce the volume of what you need to pack, making the entire job feel much more achievable. For a broader look at packing strategies that will help with your whole house.
Assemble Your Packing Supplies
Right, once you know what you’re actually keeping, it's time to gather your materials. Having everything you need on hand before you start is a game-changer, preventing those frustrating interruptions halfway through. Set up a dedicated packing station, a cleared dining table or a bit of countertop works perfectly.
You’ll need a good variety of high-quality supplies to protect your belongings properly. It’s often easiest to buy complete packages; you can find excellent home moving kits that bundle everything together, taking all the guesswork out of it.
Your essential supply list should include:
- Sturdy Boxes: A mix of small, medium, and large double-wall boxes is ideal.
- Packing Paper: Essential for wrapping individual items and providing cushioning.
- Bubble Wrap: For that extra layer of protection on delicate glassware and appliances.
- Strong Packing Tape: Don’t skimp here; you need it to securely seal every box.
- Marker Pens: For clear, bold labelling.
A classic mistake is underestimating just how much stuff is crammed into a kitchen. Surveys in the UK show kitchens typically hold 20-30% of a household's breakables, which really highlights why using the right supplies is so critical.
Create a Simple Inventory System
An inventory might sound like overkill, but it's a genuine lifesaver during a move. It doesn’t need to be complicated; a simple notebook or a spreadsheet on your phone is perfect. As you pack each box, just assign it a number and jot down a brief summary of its contents.
For example: Box #1 - Kitchen: Everyday plates, bowls & cutlery. Box #2 - Kitchen: Kettle, toaster & coffee stuff (OPEN FIRST).
This simple system is invaluable for a couple of reasons. First, it helps you find specific things quickly when you arrive at your new home (no more desperate searching for the coffee mugs!). Second, it serves as a crucial record for insurance purposes if anything gets lost or damaged along the way. Getting organised like this really is the foundation for a seamless move, ensuring everything arrives safely and can be unpacked without any fuss.
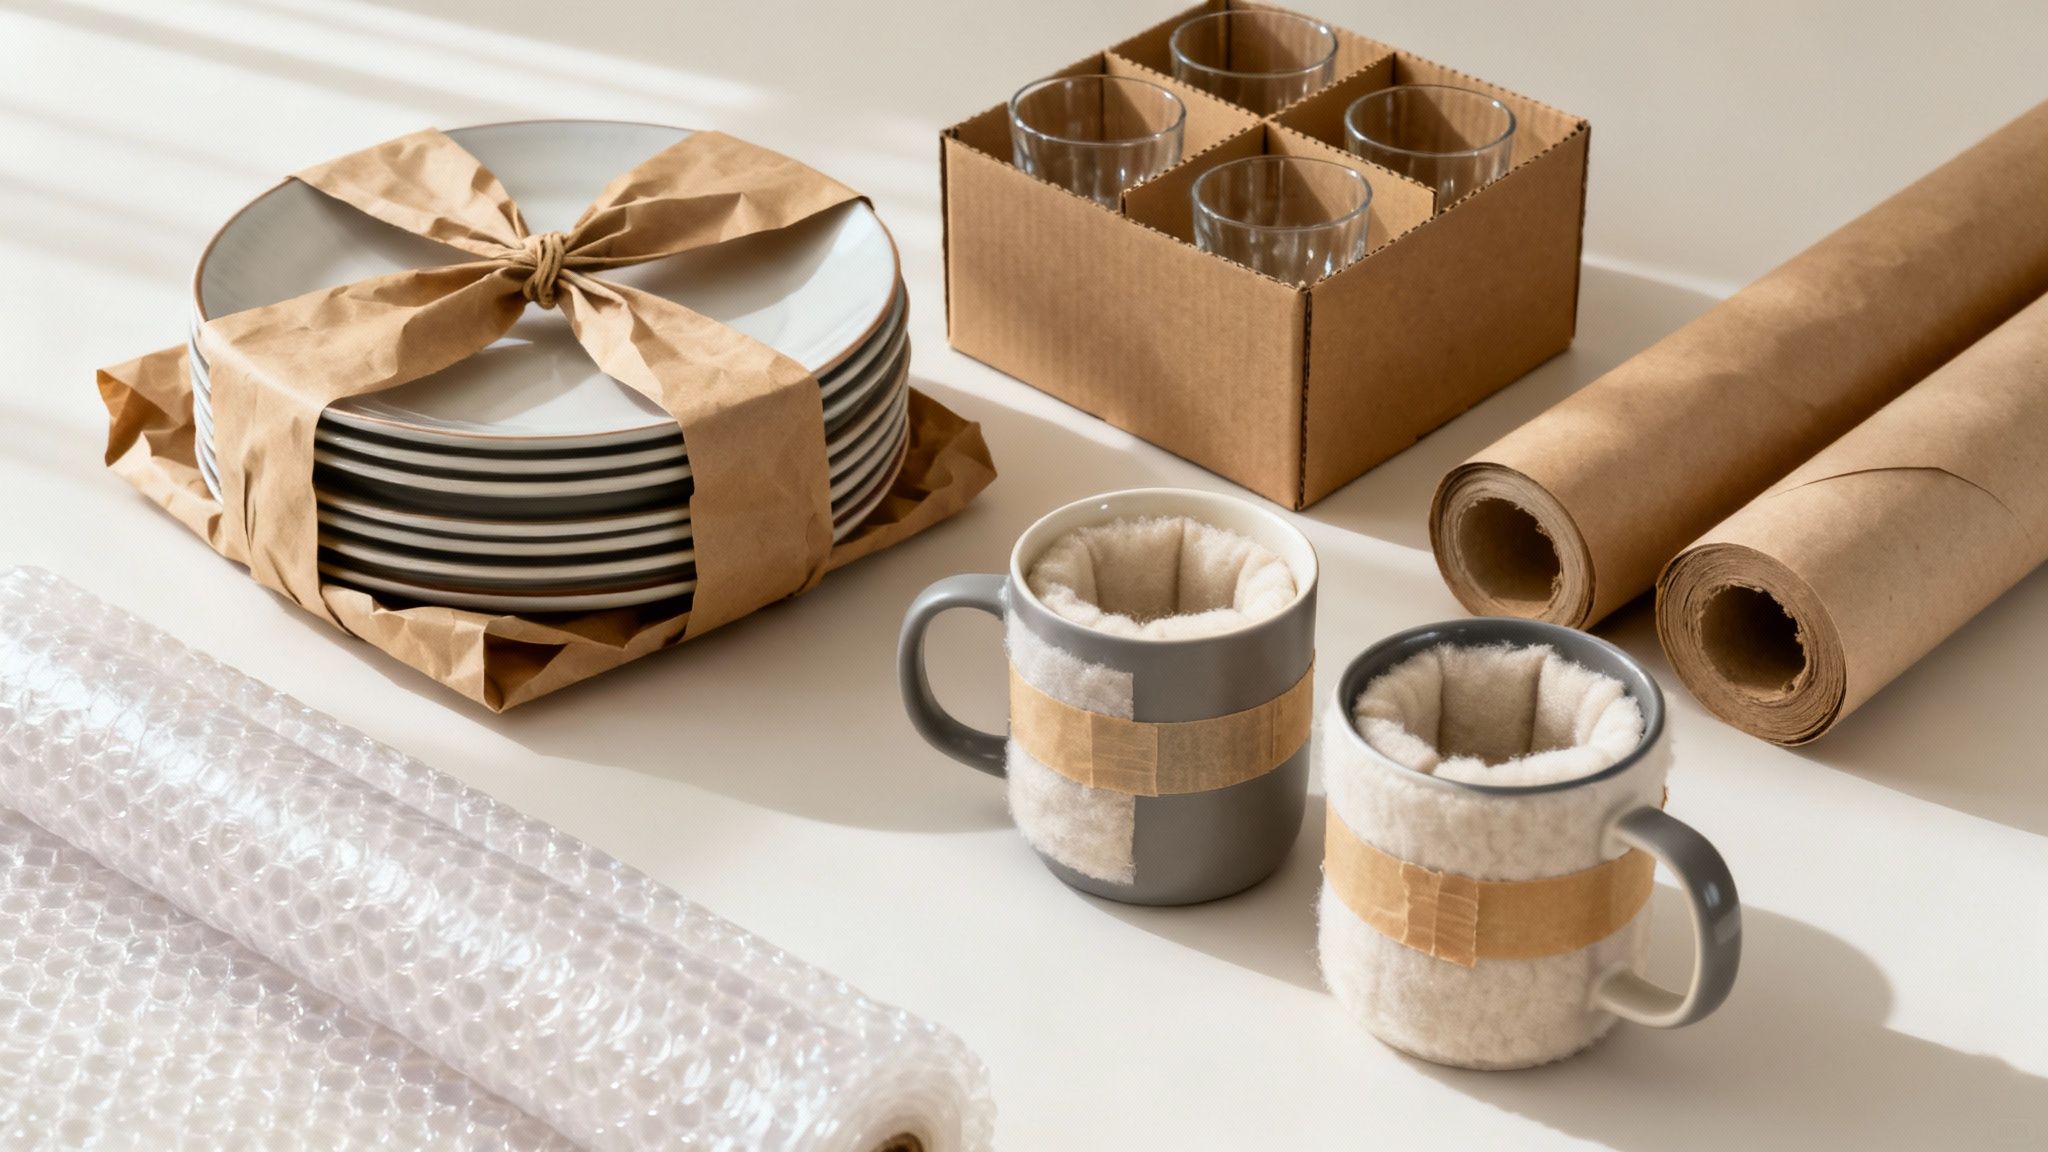
Packing Fragile Items Like a Professional Mover
Handling your fragile kitchen items is where the real skill comes in. It’s the difference between hearing a comforting silence and a heart-stopping clatter when you lift a box at your new home. Professional movers have this down to a fine art, using specific methods to ensure everything from your everyday mugs to delicate wine glasses arrives in one piece.
The secret isn't just about the box itself, but what happens inside it. It's all about creating layers of shock absorption. Every single item needs its own protective cushion, and the box has to be packed snugly to stop things shifting around on the journey.
Before you even wrap your first plate, a bit of prep goes a long way. This diagram shows the simple, foundational steps that make all the difference.

As you can see, a successful pack starts with good organisation, clearing out what you don't need, getting your supplies ready, and making an inventory, long before you touch anything fragile.
Mastering Plates and Bowls
Forget just stacking plates directly on top of each other in a box. The pro method involves wrapping and bundling to create a secure, cushioned packet that can easily handle the bumps and vibrations of the road.
Start by laying a single dinner plate in the centre of a stack of packing paper. Pull one corner of the paper over the plate and tuck it in. Now, place a second plate right on top. Pull the next corner of the paper over this one.
Keep going like this, layering plates and paper until you have a bundle of three or four plates. Then, wrap the whole bundle with the rest of the paper and seal it firmly with packing tape.
Crucial Tip: Always pack plates and platters vertically (on their edge) inside the box, never flat. Picture them like records in a crate. This dramatically reduces the stress on the items and is the single best way to prevent breakages.
For bowls, the technique is similar but focuses on nesting. Wrap your largest bowl first, then pop a smaller, wrapped bowl inside it. Make sure you add a crumpled ball of packing paper between them so they don't touch. You can nest two or three bowls together before wrapping the whole set as a single bundle.
Securing Glassware and Mugs
Your glasses, stemware, and mugs are especially vulnerable. For these, purpose-built box dividers aren't a luxury; they're an absolute must-have. They provide the best protection by keeping everything upright and separate.
Before a glass goes into a divider cell, wrap it properly.
- Stuff the Inside: Gently push a crumpled sheet of packing paper inside each glass. This supports its structure from the inside out.
- Roll and Wrap: Lay the glass on its side on a sheet of packing paper and roll it up, tucking in the sides as you go.
- Place Upright: Carefully place the wrapped glass upside down into a cell of the box divider. Packing them rim-down adds a surprising amount of stability.
Don't forget that mug handles are a weak point. When wrapping, give the handle area some extra cushioning with a folded piece of paper before rolling up the whole mug. To really get into the details of protecting your delicate belongings.
Safely Packing Knives and Sharp Objects
Sharp items pose a double risk, they can damage other things in the box and, more importantly, are a real safety hazard for anyone handling them. Never, ever pack knives loosely.
The safest method is to create a secure sheath for each blade. Lay the knife on a few sheets of packing paper and carefully roll the paper tightly around the blade, taping it securely. For extra peace of mind, you can sandwich the blade between two pieces of cardboard and tape them together before wrapping.
Once sheathed, bundle the knives together with tape and place them in a small, clearly labelled box. You must mark it on all sides with ‘SHARP KNIVES – HANDLE WITH CARE’. This ensures everyone involved in the move knows to be cautious. For particularly sharp or valuable knives, using some quality bubblewrap around the blades before bundling offers another excellent layer of protection.
Tackling Pots, Pans, and Kitchen Appliances
Right, with the delicate dinnerware safely wrapped, it's time to face the heavyweights: the bulky, often awkward collection of pots, pans, and kitchen appliances. These items are a real mix of tough and surprisingly delicate, and if you just throw them in a box, you're asking for scratches, dents, and damage. The goal here is to be clever with your space while making sure everything from your trusty frying pan to the beloved coffee machine arrives in one piece.
This isn’t just about filling boxes; it's a bit of a strategic puzzle. A little thought at this stage goes a long way, protecting your gear and making the unpacking process a whole lot smoother.
Packing Your Cookware for Maximum Protection
Your pots and pans can be a significant investment, so protecting their surfaces is the top priority. The absolute best approach is to nest them inside each other, a trick that saves a massive amount of box space.
Start with your largest pot and place it at the bottom of a sturdy, medium-sized box. Before you slot the next one in, you need to create a protective barrier. A simple sheet of packing paper, a dish towel, or a small offcut from a removal blanket works perfectly to stop scratches.
Continue this layering process, stacking smaller pots inside larger ones with a protective sheet between each. This "nesting doll" method is incredibly effective. For any glass lids, wrap them individually in packing paper. It's best to stand them vertically along the side of the box, then fill any surrounding gaps with crumpled paper to hold them steady.
- Non-Stick Surfaces: Pay extra attention to these. A single deep scratch can ruin a non-stick pan, so always place a soft layer, like a tea towel, directly on the coating before nesting another item inside.
- Loose Handles: If you have pans with removable handles, take them off. Wrap them separately and pop them in the same box. It makes packing much easier and prevents them from getting snapped off in transit.
Preparing Small Kitchen Appliances
Small appliances like your toaster, blender, or microwave need a bit of prep before they go anywhere. If you’ve been disciplined enough to keep the original packaging, now is the time for its moment of glory, it was literally made for the job.
If the original box is long gone, don't worry. A strong, correctly sized moving box will work just as well. The key is to prepare the appliance properly before it gets packed.
Give every appliance a thorough clean and make sure it is completely dry before packing. This stops any nasty odours or mould from developing, especially if your things will be in transit or storage for a while.
Once it's clean, secure any loose parts. Wrap up the cords and tape them neatly to the body of the appliance so they don't dangle and get caught. For items with removable glass parts, like a coffee pot or a blender jug, take them out and wrap them separately, just as you would with any other fragile item.
Choosing the Right Boxes and Cushioning
For these heavier kitchen items, the strength of your box is non-negotiable. Standard single-wall boxes just won't cut it for a heavy microwave or a stack of cast-iron pans. They'll buckle under the weight. You'll want to use proper double-wall boxes, which are specifically designed to handle heavy loads without giving up.
When you're packing appliances without their original box, follow these steps for a secure fit:
- Cushion the Bottom: Start by lining the bottom of the box with a generous layer of crumpled packing paper or bubble wrap. This acts as a crucial shock absorber.
- Centre the Appliance: Place your prepped appliance right in the middle of the box, making sure there is a good bit of space on all sides.
- Fill the Gaps: Tightly pack crumpled paper or foam peanuts into all the empty spaces around the appliance. The goal is to make sure it absolutely cannot shift during transit.
- Add a Top Layer: Finish with another layer of cushioning on top before sealing the box securely with strong packing tape.
Finally, always label the box clearly with its contents (e.g., "MICROWAVE" or "POTS & PANS") and mark it as "HEAVY". This gives your removal team a heads-up and ensures it gets stacked properly in the van, which means never on top of lighter, more fragile boxes.
Packing Your Pantry to Reduce Waste and Save Time
Let’s be honest, tackling the pantry is often a surprisingly satisfying part of packing up a kitchen. It’s your chance to have a proper clear-out, cut down on food waste, and make setting up in your new home that much easier. A smart approach here isn’t just about moving food; it's about saving a bit of money and starting fresh.
The process should kick off a few weeks before moving day with a simple mantra: use it or lose it. Start planning your meals around the contents of your fridge, freezer, and any other perishables. This one simple habit can seriously lighten your load.
The Great Pantry Sort-Out
Before a single tin goes into a box, you need to do a thorough audit of your shelves. This is your moment to be a bit ruthless, ensuring you only move what you’ll actually use in your new place.
Divide everything up into three piles:
- Keep: Unopened, in-date non-perishables like tins, jars, pasta, and rice.
- Donate: Any shelf-stable, unopened food you know you won't get around to using. Local UK food banks are always grateful for these donations.
- Discard: Anything that’s expired, gone stale, or has been open for way too long. Be honest with yourself about that half-used bottle of obscure sauce at the back.
This sorting process doesn't just trim down the weight you have to move; it stops you from shifting clutter into your lovely new pantry. It's a key step for an organised kitchen move.
Smart Packing for Non-Perishables
Once you’ve whittled down your collection, it’s time to get the keepers packed. The goal here is to prevent any messy spills and make unpacking as logical as possible. Always use smaller, sturdy boxes for pantry items, a box full of tins gets surprisingly heavy, very quickly.
For glass jars and bottles, a great little trick is to tape the lids shut for extra security. Wrap them individually in packing paper before placing them snugly in the box. Lighter things, like packets of crisps or boxes of cereal, can be used to fill gaps and add a bit of cushioning at the top.
Grouping similar items together is a total game-changer for unpacking. Keep all your spices in one small box, your baking supplies in another, and tins of soup in a third. This simple bit of organisation makes restocking your new shelves quick and painless.
Choosing the Right Supplies for a Lighter Load
Moving pantry items efficiently means using the right boxes for the job. You don't want a large box that becomes too heavy to lift safely or, even worse, splits open halfway to the van. Strong, smaller cartons are your best friend here.
Many people are also making more conscious choices about their packing materials. This is especially true for the growing number of people downsizing. For the 27% of UK movers who are downsizers, releasing an average of £129,000 in equity, packing lighter and more sustainably is a real priority.
For anyone looking to minimise their environmental impact, there are some excellent options available. You can find a whole range of eco-friendly moving boxes and supplies designed for exactly this purpose, offering all the durability you need without the environmental cost. It ensures your move is not only organised but also a little kinder to the planet.
Nailing the Final Details: Your Essentials Box and Labelling System
The success of your kitchen move really comes down to the small things you do right at the end. Honestly, this is where a little bit of smart organisation before you leave pays off massively when you arrive, tired and surrounded by a sea of cardboard. It’s all about creating a system that makes those first few hours in your new home calm and manageable, not completely chaotic.
Forget just scribbling "Kitchen" on a box with a marker. A truly effective system gives you the information you need at a single glance, saving you from ripping open five different boxes just to find a teaspoon. This is where a simple, multi-part labelling method becomes your best friend.
A Smarter Labelling Strategy
A good label should tell you three key things instantly. This simple structure will revolutionise how you unpack and help your removal team place boxes exactly where they need to go, even if you’re not there to direct them.
For every single kitchen box, make sure your label includes:
- The Room: Start with the destination. Write KITCHEN in large, clear letters on the top and at least two sides of the box.
- The Contents: Add a brief, simple summary of what's inside. Think "Pots & Pans," "Everyday Mugs & Glasses," or "Baking Tins."
- The Priority Level: This is the real game-changer. Add a note like "OPEN FIRST," "HIGH PRIORITY," or "LOW PRIORITY - Unpack Last."
This simple approach turns a daunting pile of boxes into an organised, logical system. You'll know immediately which one contains the kettle for that all-important first cuppa and which one holds the fancy serving platters that can definitely wait until tomorrow. For a professional finish, using proper pre-printed packing labels makes this process even faster and clearer.
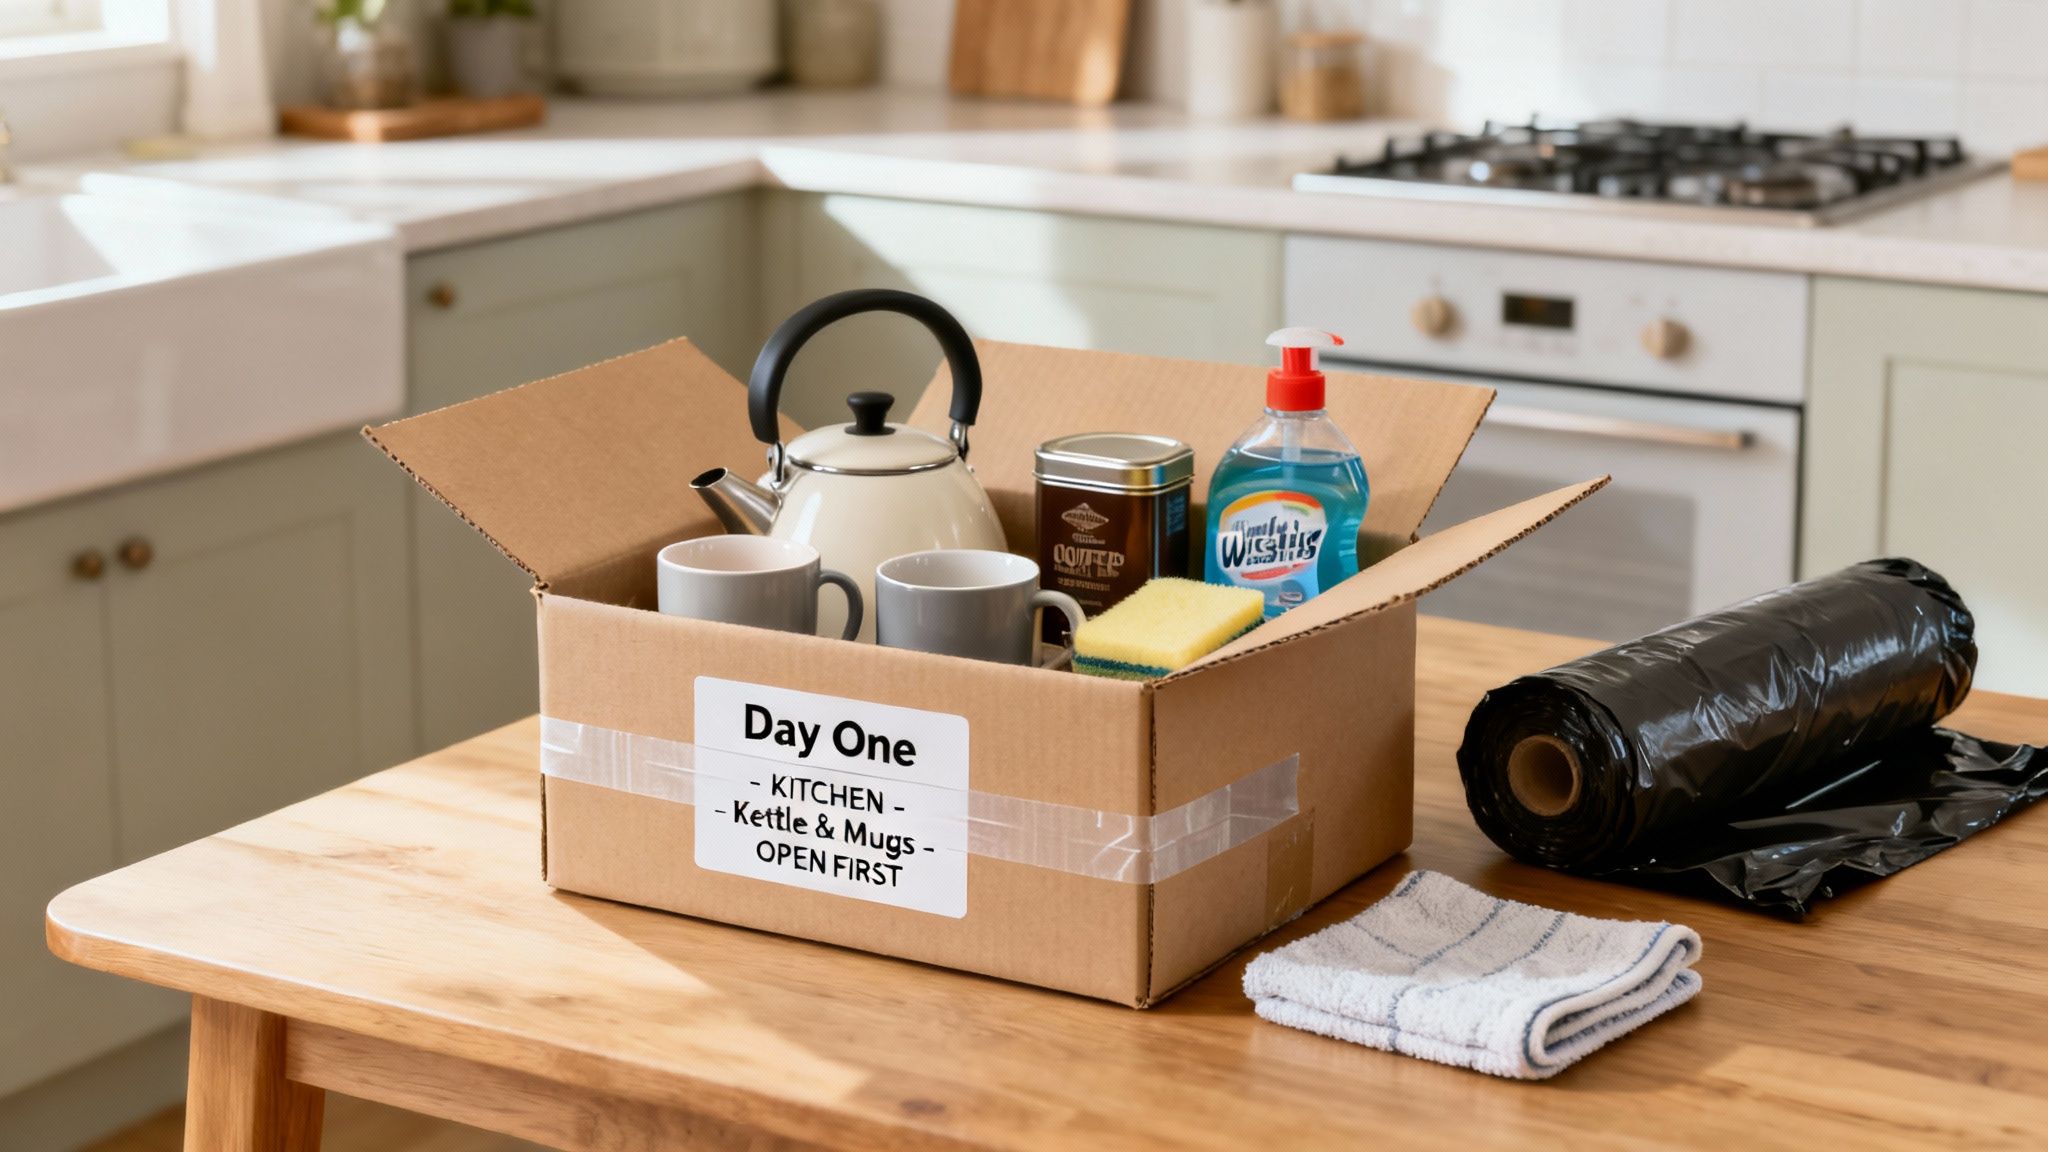
Creating Your Day One Essentials Box
Of all the boxes you pack, one is more critical than any other: the "Day One Essentials Box." This is your survival kit for the first 24 hours in your new home. It should contain everything you need to make a drink, rustle up a simple meal, and do a basic clean-up without having to search for a single thing.
This box should not go in the moving van with everything else. Keep it with you in your car. This guarantees you have immediate access to it the second you walk through the new front door, regardless of when the removal lorry arrives.
Your essentials box is your first step towards feeling human again after a long day of moving. Trust me, the relief of being able to instantly make a cup of tea is something you simply can't overstate.
So, what goes into this magical box? Here’s a tried-and-tested checklist to make sure you have all your bases covered from the moment you arrive.
Your Day One Kitchen Essentials Checklist
Pack these items in a clearly marked box for immediate access to make your first hours in your new home seamless.
| Category | Essential Items | Reason for Inclusion |
|---|---|---|
| Refreshments | Kettle, coffee/teabags, sugar, UHT milk, mugs | For that desperately needed first cup of tea or coffee. |
| Basic Meals | Small frying pan, knife, chopping board, tin opener, a couple of plates, cutlery | Allows you to prepare a simple first meal without unpacking everything. |
| Cleaning Up | Washing-up liquid, sponge, tea towel, multipurpose spray, paper towels, bin bags | For a quick wipe-down of surfaces and washing up after your first meal. |
| Other Lifesavers | Phone charger, small first-aid kit, pet food/bowls, non-perishable snacks | Covers the little emergencies and comforts that make a huge difference. |
Having these items on hand means you can relax a little before tackling the mountain of unpacking ahead.
Finally, remember that inventory list you (hopefully) created at the very beginning? Now is its time to shine. As the boxes are brought into your new kitchen, use your list to check them off. This gives you instant confirmation that everything has arrived safely and helps you locate a specific box in seconds if you suddenly need it. Nailing these final details is what transforms a stressful move into a smooth, controlled transition.
Common Questions About Packing a Kitchen
Even with the best packing plan in the world, you're bound to run into a few tricky questions when you’re knee-deep in boxes. It’s completely normal. The kitchen, in particular, throws up all sorts of little challenges that can stop you in your tracks.
Think of this as your go-to guide for those moments. We’ve rounded up the most common queries we hear day in, day out, and given you the straight, practical answers you need to keep things moving.
How Many Boxes Do I Really Need for My Kitchen?
Figuring out the box count is a classic moving-day worry, but there’s a solid rule of thumb that’ll get you very close. For a typical kitchen in a 3-bedroom UK house, you should budget for around 10-15 medium boxes for your general bits and pieces and cookware.
You’ll also want 4-6 small, sturdy boxes for heavy things like tins and jars, plus 3-5 proper dish-pack boxes for your fragile plates and glasses. I’d always suggest buying about 10% more boxes than you think you need. Running out of supplies mid-pack is a real momentum killer you can easily avoid.
What Is the Safest Way to Pack Sharp Knives?
Never, ever just drop loose knives into a box. It's a massive safety risk for both you and your movers. The only safe way is to wrap each blade securely in several layers of packing paper or a bit of bubble wrap, then tape it firmly in place so it can’t slip out.
Once they're all individually wrapped, bundle them together and pop them in a small, tough box. The most important step? Label the box clearly on every single side with something like 'SHARP KNIVES - HANDLE WITH CARE'. You can’t make the warning too obvious.
Here's a pro tip for extra safety: After wrapping the blade, sandwich it between two pieces of thick cardboard cut to size and tape it all together. This creates a rigid, custom sheath that makes it almost impossible for the blade to poke through.
Do I Need to Empty My Kitchen Drawers?
Yes, one hundred percent. You absolutely have to empty them. Even seemingly lightweight stuff like cutlery or tea towels adds up, and more importantly, it can all shift around in transit. This movement can easily damage the drawer, its runners, or even the whole piece of furniture.
Professional removal crews will almost always insist on drawers being empty as part of their standard safety practice. Besides, it gives you the perfect chance to give the drawers a good clean before you move out. It’s a win-win.
Is It Okay to Use Newspaper to Wrap My Dishes?
While it might feel like a thrifty, eco-friendly idea, we strongly advise against using newspaper. The ink is a real nightmare and can easily rub off onto your plates, mugs, and glasses, especially if there's any moisture in the air.
You’ll be left with a tedious cleaning job just when you want to start unpacking and settling in. Investing in a pack of clean, ink-free packing paper is a small price to pay to protect your kitchenware and save yourself a world of hassle later on.
For a stress-free move, having the right supplies is non-negotiable. The Box Warehouse is your one-stop shop for professional-grade moving boxes, packing paper, bubble wrap, and everything else you need to pack your kitchen like a pro. Order your complete home moving kits today!


