Published on : 23 December 2025
How to Pack Glasses for Moving Without a Single Break
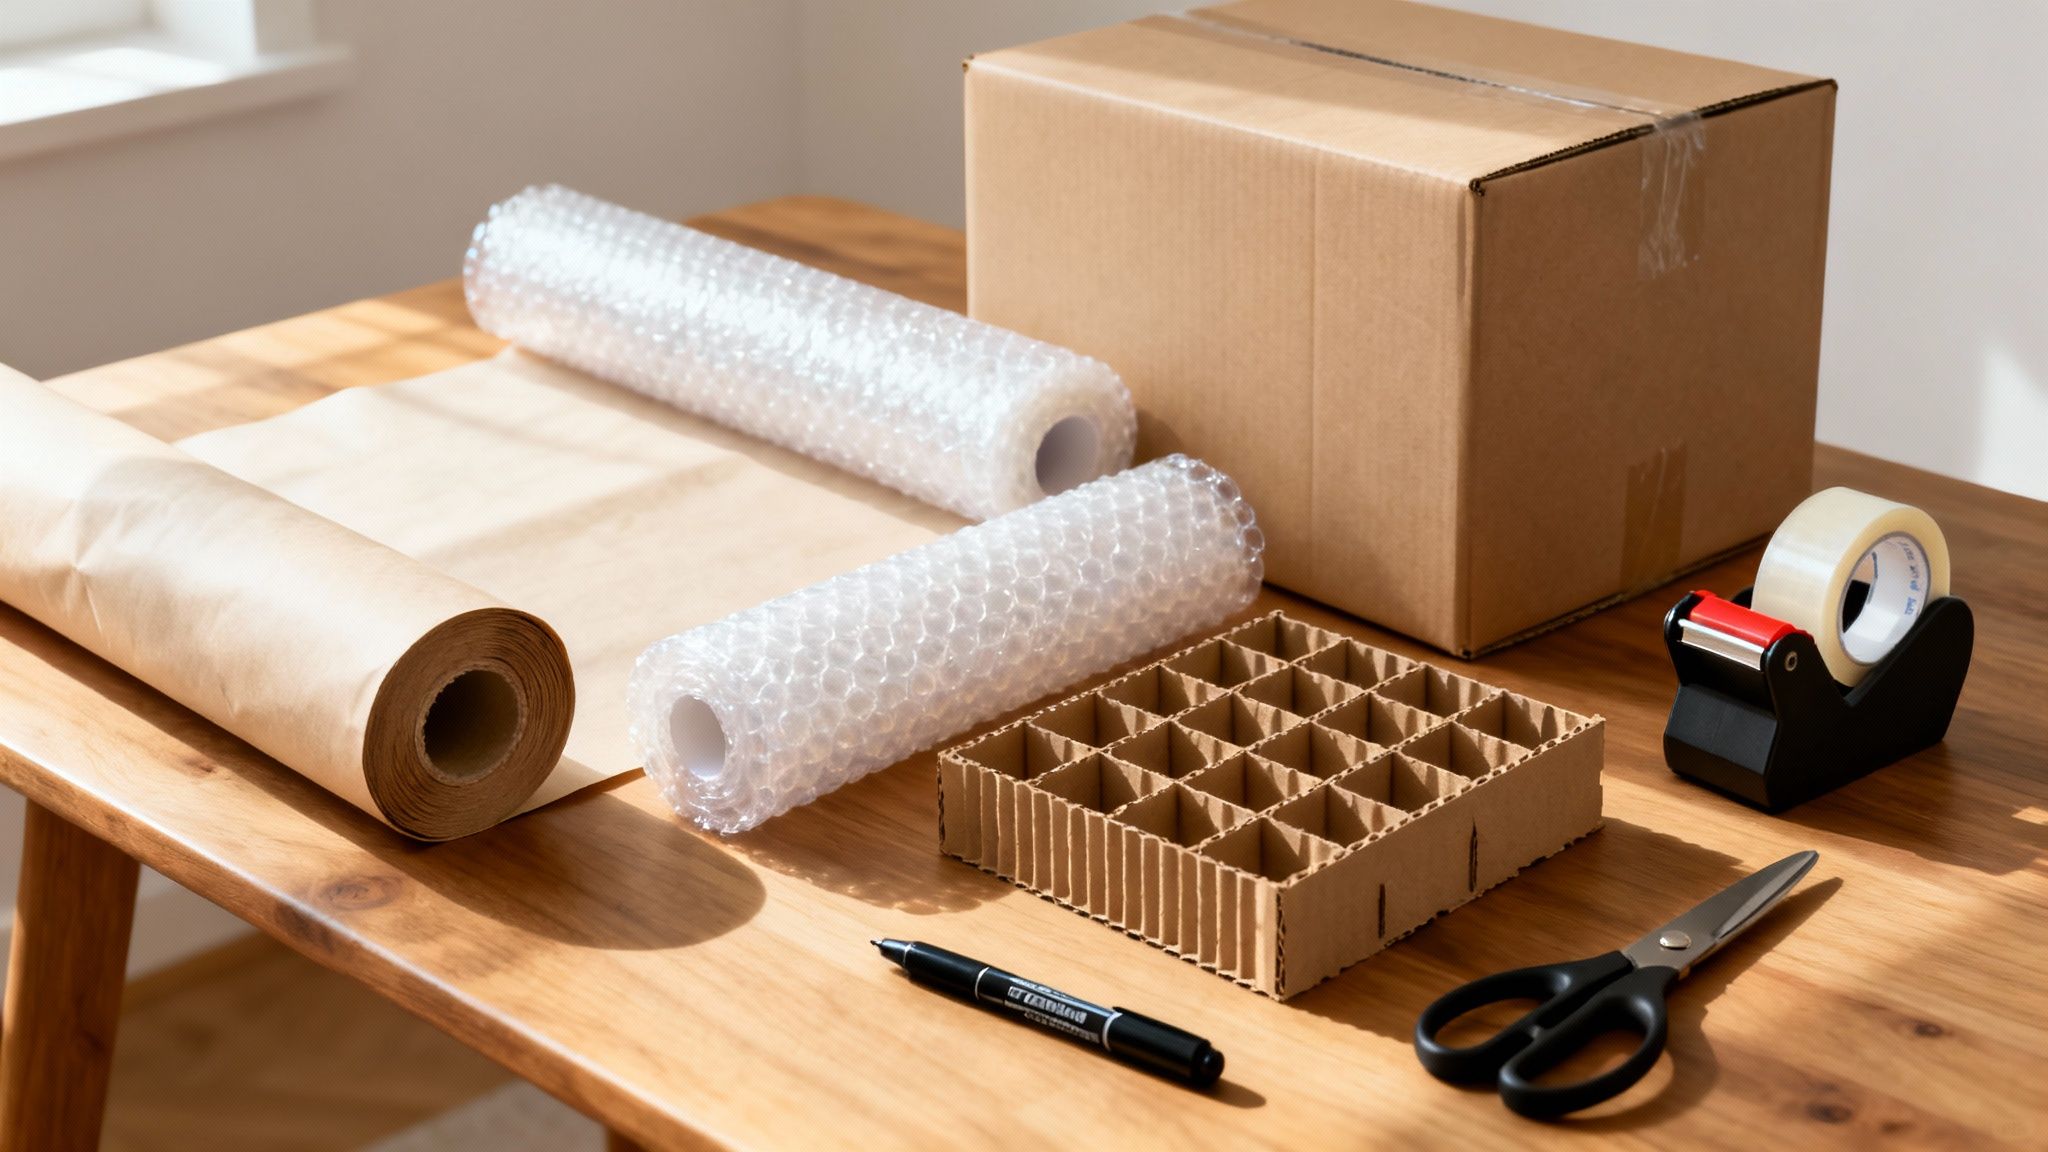
The secret to moving your glasses without a single casualty starts long before you even touch a box. It’s all about having the right tools for the job. Think sturdy boxes, cellular dividers, and ink-free packing paper. Get the setup right from the very beginning, and you’re halfway to a smash-free move.
Gathering Your Essential Packing Supplies
Before you wrap your first wine glass, do yourself a favour and set up a proper packing station. This isn’t about being fussy; it’s about being efficient. A clear, flat surface like your dining table is perfect. It stops you from constantly hunting for the tape and dramatically cuts down the risk of a clumsy drop.
Having the correct materials on hand turns a stressful chore into a straightforward process. Trust me, investing in professional-grade supplies is an investment in protecting your belongings.
The Core Toolkit For Damage-Free Packing
Your shopping list should be all about quality. I know it’s tempting to grab old newspapers or a few towels to save a few quid, but these common substitutes create risks you can easily avoid.
Here are the absolute must-haves:
- Double-Walled Cardboard Boxes: These are miles stronger than the standard single-walled boxes you might get from a supermarket. Their two-layer design gives them far better crush resistance, which is vital when boxes are stacked high in a moving van. Stick to small or medium sizes to stop them from getting too heavy to handle safely.
- Unprinted Packing Paper: This is your number-one tool for wrapping. Unlike newspaper, it’s completely ink-free, so you won’t spend your first day in the new house scrubbing stubborn smudges off your glassware. It's also soft and pliable, moulding around delicate stems and rims without adding too much bulk.
- Cellular Dividers: These cardboard grids are a total game-changer. They create individual, cushioned cells inside your box, stopping glasses from clinking against each other. For fragile stemware or your best crystal, they provide a snug fit that stops any movement at all. They're non-negotiable, in my book.
- High-Quality Packing Tape: Don't skimp here. A cheap tape can easily give way under the weight of a full box of glasses. Securing the bottom seams properly with strong tape is your first line of defence against a moving-day disaster.
Choosing the right materials is the first and most critical step. We’ve all seen what happens when people cut corners, and it’s rarely a pretty sight. This quick table breaks down why using the proper gear is so important.
Your Packing Toolkit: What to Use and What to Avoid
| Material | Why It's Recommended | Common Substitute to Avoid | Why It's Risky |
|---|---|---|---|
| Double-Walled Boxes | Superior crush resistance for safe stacking. | Single-Walled Supermarket Boxes | Easily collapse under weight, offering little protection. |
| Unprinted Packing Paper | Ink-free, clean, and moulds perfectly to glassware. | Newspaper | Ink transfers easily, creating a huge cleaning job. |
| Cellular Dividers | Creates individual compartments to prevent collisions. | Old Towels or T-shirts | Bulky, offers inconsistent cushioning, and allows movement. |
| Quality Packing Tape | Strong adhesive that secures box seams reliably. | Masking or Sellotape | Lacks the strength to hold the weight, can easily peel off. |
Sticking to the recommended list gives you a purpose-built system designed to protect your glassware, not just a random collection of supplies.
When to Add Extra Protection
While packing paper does a brilliant job for everyday tumblers and pint glasses, some items demand an extra layer of security.
For your truly fragile or sentimental pieces—think antique crystal, paper-thin champagne flutes, or that irreplaceable wedding gift—it’s smart to bring in some extra cushioning. This is where you’ll want some bubble wrap for sale to provide that essential shock absorption.
Expert Tip: Never use bubble wrap directly against the glass. It can trap condensation, and on very delicate surfaces, the bubbles can sometimes leave faint impressions. Always wrap the glass in packing paper first, then add a layer of bubble wrap for that final, bomb-proof layer of security.
By getting these specific supplies together before you start, you’re not just buying boxes and paper. You’re building a proven system that will get every single glass to your new home in one piece. This prep work is the true foundation of a successful move.
Preparing Your Glassware for a Safe Journey
Before you even think about unrolling a single sheet of packing paper, there’s a little prep work that will massively boost the chances of your glasses arriving in one piece. Think of this as the professional’s first step; it’s a simple routine that sidesteps some of the most common, and completely avoidable, breakages.
First things first, give every single glass a good wash and, more importantly, make sure each one is bone dry. Any lingering dust or grit left on the surface can act like sandpaper when the moving van starts vibrating. That constant jiggling can cause tiny scratches and scuffs, permanently dulling your favourite glassware. A clean, dry surface is the only way to start.
Sort Your Glasses for Strategic Packing
Once everything is sparkling clean, resist the urge to just grab the nearest glass and start wrapping. Instead, take a minute to sort your collection into distinct categories on your packing table. This isn't just about being tidy; it’s about tailoring your wrapping technique to the specific needs of each type of glass.
You'll probably end up with groups that look something like this:
- Robust Daily Drinkware: This is your sturdy stuff – pint glasses, thick-bottomed tumblers, and chunky Mason jars. They can generally handle a bit more pressure.
- Delicate Stemware: Group all your wine glasses, champagne flutes, and cocktail coupes together. Their fragile stems are their biggest weakness and need a special wrapping method.
- Miscellaneous Shapes: Mugs with handles, unusually shaped glasses, or heavy crystal pieces should all form their own little group.
Sorting first creates an efficient, assembly-line-style process. It means you handle each piece less and can get into a good rhythm, wrapping each category with the specific level of care it actually needs. You’ll work faster and, crucially, much more safely.
A classic mistake is packing heavy tumblers in the same box as delicate wine glasses. The weight difference alone is a huge risk. A minor jolt in the van is all it takes for a heavy item to crush a lighter one, no matter how well they’re wrapped.
This initial bit of organisation might feel like an extra chore, but it really does set the stage for success. It forces you to think about the unique weak points of each piece before you start wrapping, giving every single glass the best possible protection for the journey ahead.
Mastering Wrapping Techniques for Different Glass Types
Not all glassware is created equal, so your packing strategy shouldn't be a one-size-fits-all job. A delicate champagne flute has completely different weak points to a sturdy pint glass, and mastering a few specific wrapping techniques is the key to ensuring everything arrives intact.
Before you even touch a roll of paper, it’s worth taking a moment to think about the materials you're working with. For instance, if you're packing fine china alongside your glasses, understanding the unique properties of bone china and porcelain is a great place to start, as their delicacy demands a careful touch.
This diagram shows the simple but essential preparation steps we’ve just talked about – the absolute must-dos before you start wrapping.

This visual process—Wash, Dry, Sort—is the non-negotiable foundation for successful packing. It prevents scratches and helps you organise your wrapping strategy much more efficiently.
Protecting Fragile Stemware
Stemware is easily the most vulnerable item in your collection. That connection point between the stem and the bowl is incredibly fragile, so your wrapping method absolutely must prioritise protecting this area.
Start by gently stuffing a small, crumpled piece of packing paper into the bowl of the glass. This simple step provides internal support and stops the thin glass from flexing under pressure.
Next, focus on the stem. Take a single sheet of packing paper and wrap it snugly around the stem, working your way up towards the base of the bowl. This reinforces the glass exactly where it needs it most. Once the stem is secure, place the glass on its side at the corner of another sheet of paper and roll it diagonally, tucking in the sides as you go to create a cushioned cocoon.
The Best Method for Tumblers and Pint Glasses
For your more robust, everyday glasses like tumblers, pint glasses, and mugs, a more efficient technique works perfectly. You can often wrap several at once without compromising their safety one bit.
Lay out a stack of two or three sheets of packing paper and place a single tumbler on its side at one corner. Roll it forward twice, then place a second tumbler right next to it and continue rolling, wrapping the second glass into the bundle. You can typically do this with three or four similar-sized glasses, creating a well-padded bundle where each one is separated by at least two layers of paper.
Key Takeaway: The goal is to create a 'log' of wrapped glasses that is firm and secure. This method is fast and effective, but make sure the glasses are of similar size and weight to avoid any uneven pressure points within the bundle.
Extra Care for Antique and Crystal Glassware
Extremely delicate or valuable items, like antique crystal or heirloom pieces, demand the highest level of protection. This is where you bring in the extra supplies because a single layer of paper just isn't going to cut it.
First, wrap the item thoroughly in packing paper, using the right method for its shape. Once the paper layer is complete, add a generous layer of bubble wrap around the outside, securing it with a small piece of tape. For maximum protection, you could even place each piece into its own padded sleeve. You can find excellent, ready-made options like these purpose-designed bubble pouches, which provide a perfect fit and eliminate any movement.
This extra effort might feel time-consuming, but it’s essential. With around 2.1 million moves happening in the UK annually, removal firms are often stretched, especially on peak days. Poorly prepared fragile goods are the first to suffer from the inevitable bumps that can occur when logistics are strained. Taking these extra precautions ensures your most prized possessions are ready for anything the journey throws at them.
How to Box and Cushion Glassware Like a Pro
A perfectly wrapped glass is only as safe as the box it’s in. Proper boxing and cushioning are what stand between your careful work and the harsh realities of a bumpy road. The goal is to transform a simple container into a protective vessel, and it all starts from the ground up.
Before you even think about placing a glass inside, create a generous foundation. You need to build a shock-absorbing base using crumpled packing paper. Don't be shy here; a layer that’s at least two inches deep is non-negotiable. This base layer acts as the box's suspension system, absorbing the initial impacts and vibrations from transit.
The Golden Rules of Loading
Once your base is ready, the loading process itself follows a strict hierarchy. Think logically about weight and stability to prevent any internal crushing or shifting.
- Heaviest First, Always: Start by placing your sturdiest and heaviest wrapped glasses at the bottom. This includes things like pint glasses, heavy-bottomed tumblers, and thick glass mugs. Creating a stable base stops the box from becoming top-heavy and protects the lighter, more delicate items from being crushed from above.
- Stand Them Tall: Every single glass, from delicate stemware to robust tumblers, must be placed upright. This is their strongest orientation, just as they would sit in a cupboard. Laying them on their sides makes them incredibly vulnerable to snapping under pressure.
As you load, keep filling any obvious gaps with more scrunched-up paper. Remember, empty space is your enemy. The slightest void allows for movement, and movement inevitably leads to collisions.
The core principle of how to pack glasses for moving is immobilisation. If nothing can shift, clink, or slide, the risk of breakage plummets. Your aim is a box that feels solid and silent when you give it a gentle shake.
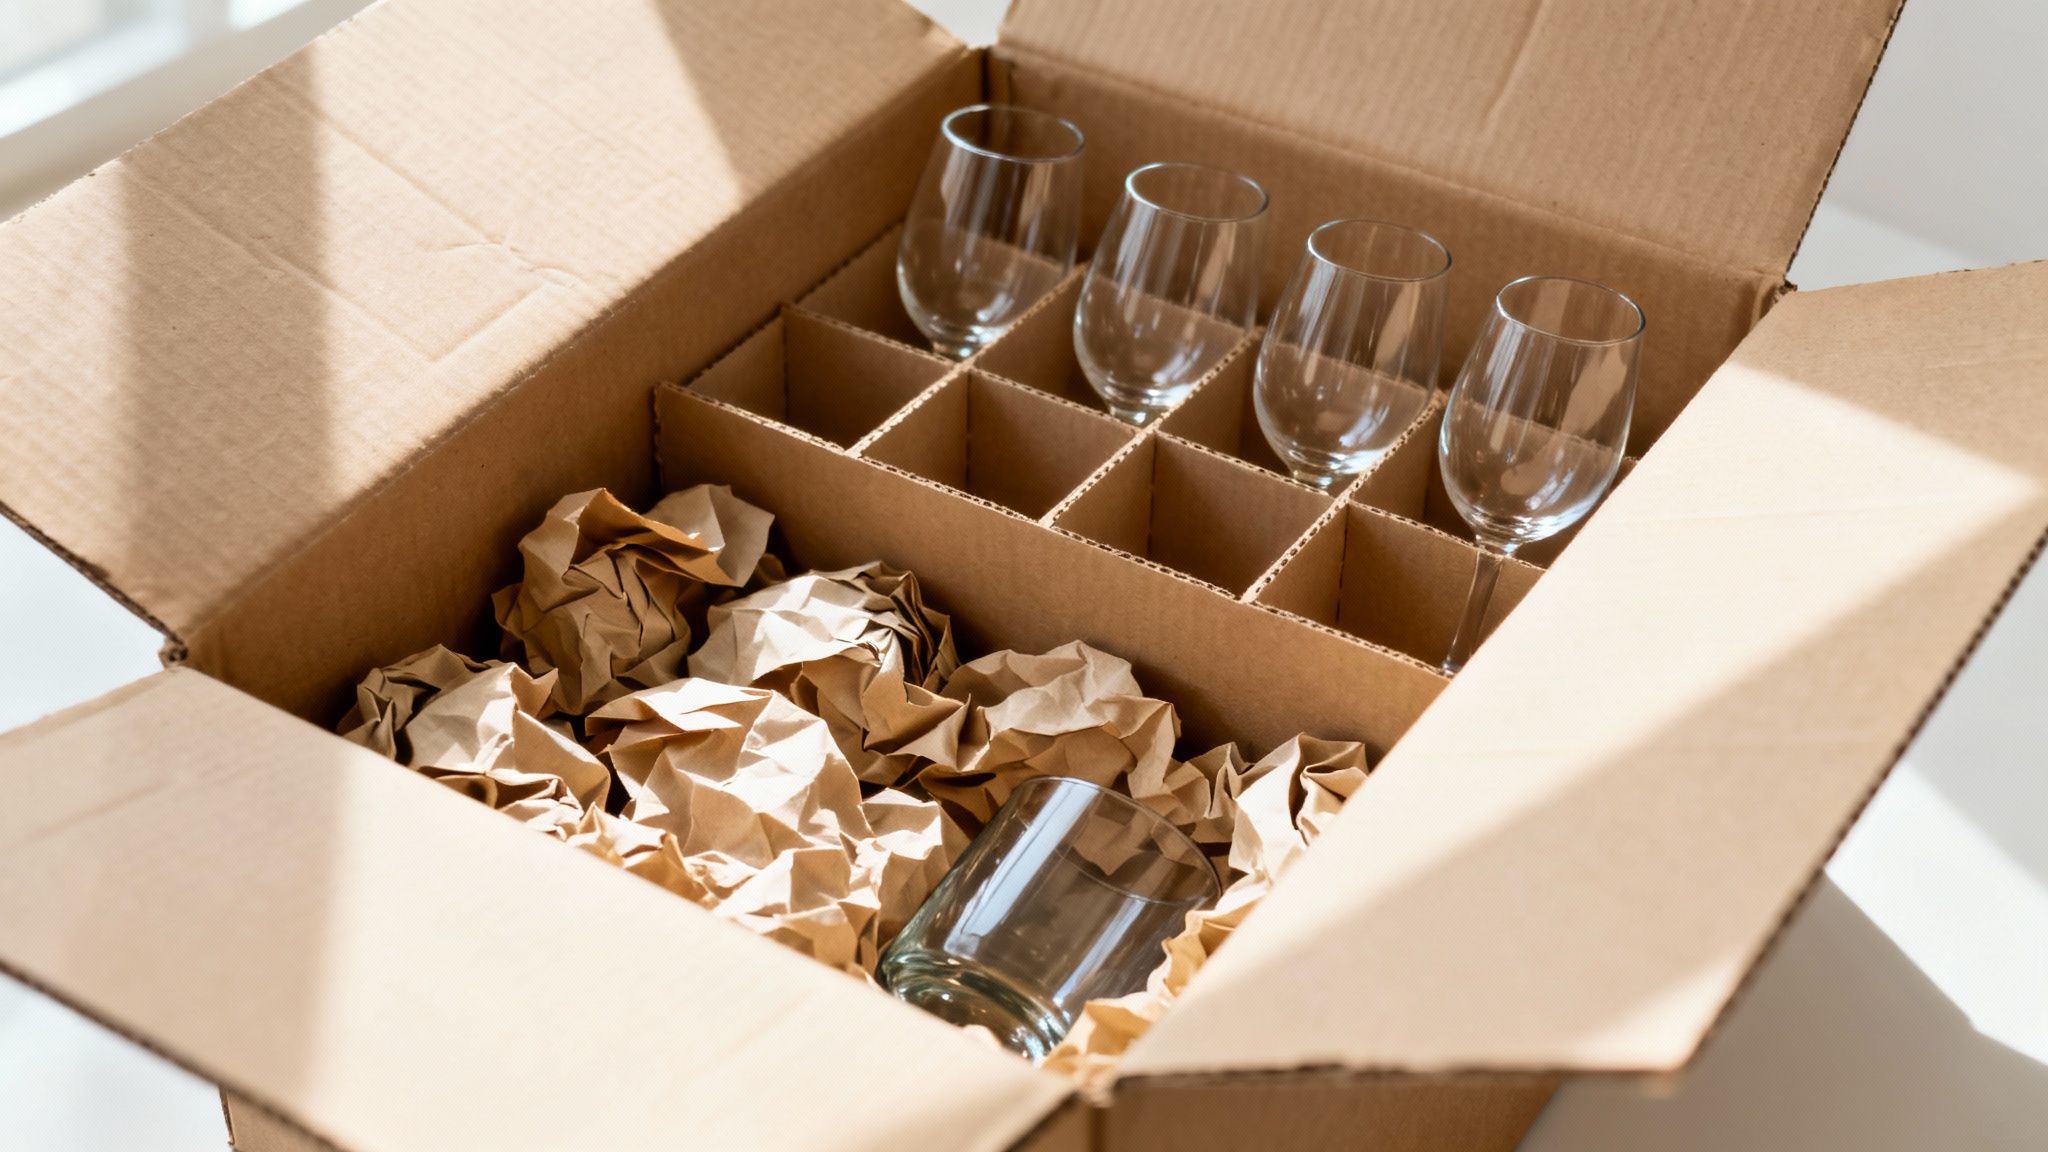
Using Dividers and Filling Voids
For an expert level of protection, especially for your best wine glasses or valuable crystal, cellular dividers are a game-changer. These cardboard inserts create individual, snug compartments for each glass, completely eliminating the risk of them knocking against one another. They provide a structured, protective grid that makes packing faster and significantly safer.
When selecting your containers, it's paramount for safety to use specialised materials. Utilising heavy-duty boxes for ultimate protection ensures the container's structure won't fail under pressure. For smaller collections, compact yet durable options like square cardboard boxes are an ideal choice, as they limit the overall weight and are much easier to handle safely.
After all your glasses are in place, the final step is to fill every remaining nook and cranny. Systematically push crumpled paper into the gaps between the glasses and along the box's sides until everything feels snug.
Finally, create a top cushion identical to the one at the bottom another dense, two-inch layer of crumpled paper. This top buffer protects your glassware from pressure if another box gets stacked on top. Before you seal it up, gently press down on this layer; it should feel firm with very little give.
The Final Steps: Labelling and Safe Handling
You’ve done the hard part. Your glasses are wrapped, padded, and boxed up securely. But the job’s not quite over yet. This final stage is all about clear communication and smart handling, because how you label and move these boxes is every bit as important as how you packed them in the first place.
Think of your labels as a direct message to your movers—or even to your future, exhausted self. A hastily scribbled "kitchen" just won't do. You need to be bold, clear, and impossible to ignore to make sure these boxes get the VIP treatment they deserve. This is a non-negotiable step for getting your glassware to its destination in one piece.
Make Your Mark Clear and Unmistakable
Grab a thick, black permanent marker. You're going to label every single box of glassware on at least three sides – the top and two opposite sides. This simple bit of repetition means the warning is visible no matter how the box is stacked or carried.
Each label needs three crucial pieces of information:
- FRAGILE: Write this in massive, capital letters. It’s the universal sign for "handle with care."
- Contents: Be specific. "WINE GLASSES" or "GIN GLASSES & TUMBLERS" is much more helpful than "glass." It’ll save you a headache when you’re desperate for a cuppa later.
- Destination Room: A clear "KITCHEN" saves so much time and lugging boxes around when you arrive.
For a bit of extra insurance and visibility, pre-printed stickers are a brilliant idea. They stand out far more than marker pen. Something like these ‘Glass with Care’ labels leaves absolutely no room for doubt.
Pro Tip: Always add "THIS WAY UP" with big, clear arrows pointing to the top of the box. Glasses are packed to handle pressure from above, so keeping them the right way up during transit is absolutely vital for preventing breakages.
Strategic Stacking and Handling
Once they're all labelled up, how you stack these boxes matters a great deal. If you can help it, never put a box of glassware directly onto a hard floor; a folded removal blanket underneath can provide a fantastic layer of shock absorption.
When it comes to loading the van, have a word with your movers. Make sure it's understood that boxes marked fragile are never, ever placed at the bottom of a stack. They belong on top of sturdy furniture or on top of heavier, more solid boxes (like those filled with books). They need a stable, flat surface where they are safe from being crushed.
Treat these boxes with the respect their contents demand, and they'll reward you by arriving safely—ready for that first celebratory drink in your new home.
Common Questions About Packing Glasses for Moving
Even with the best guide in the world, you’re bound to hit a few questions when you start packing something as fragile as glassware. It’s completely normal. Dealing with your delicate items brings up all sorts of little queries, and getting them right is the key to packing with confidence.
To help you out, we’ve put together some straight answers to the most common questions we hear. Think of it as your troubleshooting guide for getting every box just right.
Can I Just Use Newspaper Instead of Packing Paper?
While it might feel like a savvy way to save a bit of money, using newspaper is one of the classic packing mistakes. The real problem is the ink. It has a nasty habit of transferring onto your glassware, especially in a humid environment, leaving you with a huge scrubbing job when you unpack.
More importantly, newspaper is thin and offers very little in the way of proper cushioning. Professional packing paper is ink-free, soft, and designed to absorb knocks. It’s a small investment that provides far better protection and saves you a world of cleaning later on.
Should Glasses Be Packed Upright or Sideways?
Always, always, always pack your glasses standing upright on their rims. No exceptions. This is their strongest position, just like when they're sitting in your cupboard. It allows them to handle pressure from above without putting any stress on the delicate sides or stems.
Laying glasses on their sides makes them incredibly vulnerable. All the weight and pressure from other items gets focused on their weakest points, making them far more likely to crack or snap during transit. Stick to the upright rule for a much safer journey.
How Full Should I Make the Box?
Your goal is to pack the box so it’s completely firm, with zero room for anything to shift around. Once all your wrapped glasses are in place, your job is to stuff every single gap between the items, along the sides, and right up to the top—with crumpled packing paper.
A perfectly packed box of glasses should make no noise. If you seal it and give it a gentle shake, you shouldn't hear or feel a thing. Just be careful not to overstuff it so much that the sides start to bulge, as that creates its own pressure points.
What Are the Best Boxes for Glassware?
For packing glasses, your best bet is always a small or medium-sized, double-walled cardboard box. Using smaller boxes is a simple but crucial trick; it stops you from making them too heavy, which massively reduces the risk of them being dropped or mishandled.
The double-walled construction is non-negotiable as it provides the rigidity needed to resist being crushed. For the ultimate protection, look for specialised glassware boxes that come with cardboard cellular dividers. These create individual cells that stop glasses from touching each other at all. If you have more general queries about moving supplies, you can find more answers in our frequently asked questions section.
Ready to get packing? The Box Warehouse has everything you need, from double-walled boxes and cellular dividers to ink-free packing paper and fragile labels. Visit https://www.theboxwarehouse.co.uk to order your professional-grade moving supplies today.


