Published on : 01 January 2026
Moving Packing Papers: moving packing papers Best Practices for Fragile Items
Moving packing paper is one of those simple, unsung heroes of a successful move. It’s absolutely essential for protecting your fragile items, from everyday glassware to delicate electronics. Unlike old newspaper which can leave messy ink stains all over your belongings, proper packing paper offers a clean, versatile, and surprisingly affordable cushion against scratches, chips, and breaks.
Why Quality Packing Paper Is a Mover’s Secret Weapon
When the chaos of moving day is looming, it’s all too easy to start cutting corners on supplies. Lots of people are tempted to just grab a stack of old newspapers or hope for the best, but honestly, that’s a gamble that almost never pays off. Professional moving packing paper isn’t an expense; it’s a small investment in the safety of everything you own.
Think of packing paper as the first line of defence for your valuables. It provides a soft, completely ink-free barrier that stops items from scratching and scraping against each other while they’re rattling around in a van. This is especially crucial for:
- Dinnerware: Plates, bowls, and mugs can easily chip the second they shift inside a box.
- Glassware: Delicate wine glasses and tumblers need to be wrapped individually to absorb shocks and vibrations.
- Decorative Items: Vases, picture frames, and ornaments are particularly vulnerable to cracks and breaks.
- Electronics: It provides a clean barrier that helps protect screens and sensitive components from surface damage.
The Real Cost of Subpar Materials
Using newspaper might seem like a thrifty choice at first, but that ink can permanently stain delicate china, light-coloured fabrics, and porous materials like unglazed pottery. T-shirts and towels, another common substitute, offer really inconsistent cushioning and can leave items loose and unprotected within the box.
The goal is to create a snug, cushioned environment where nothing can shift, rattle, or collide. Quality paper allows you to wrap items tightly and fill every single void, effectively immobilising your valuables for their journey.
This is exactly why professional removal companies rely on purpose-made materials. The removal services industry in the UK, which is trusted to safeguard countless household items during transit, generated an estimated £1.4 billion in revenue in 2025. With a national housing backlog of millions and government initiatives aiming to build 1.5 million new homes, the demand for reliable moving supplies is only going to grow.
Choosing the Right Protection
For a stress-free move, opting for professional supplies is by far the smartest strategy. Clean, unprinted newsprint offcuts are perfect for the vast majority of household goods, offering a fantastic blend of affordability and protection.
Investing in a proper 5kg pack of wrapping newspaper offcuts ensures you have more than enough clean material to safeguard everything from your everyday dishes to irreplaceable family heirlooms. It's the simple, effective secret weapon that helps turn a potentially disastrous move into a smooth and successful one.
Mastering the Art of Wrapping Fragile Items
Unpacking to find a box of shattered glass or a scratched TV screen is a completely avoidable moving day tragedy. The secret isn't just using packing paper; it's about mastering a few simple techniques that transform a flimsy sheet into a protective shield. Let's move beyond just scrunching paper and get into the specific methods that keep your most fragile possessions safe.
These aren't complicated procedures, but they make a world of difference. Each one is designed to cushion, brace, and immobilise items, turning a standard moving box into a secure transport pod for your valuables.
The Essential Kitchenware Wrap
The kitchen is often the most time-consuming room to pack, absolutely filled with breakables of all shapes and sizes. Don't just wrap things randomly; use methods tailored to their specific weak points. A little extra care here will save you a lot of heartache and money later.
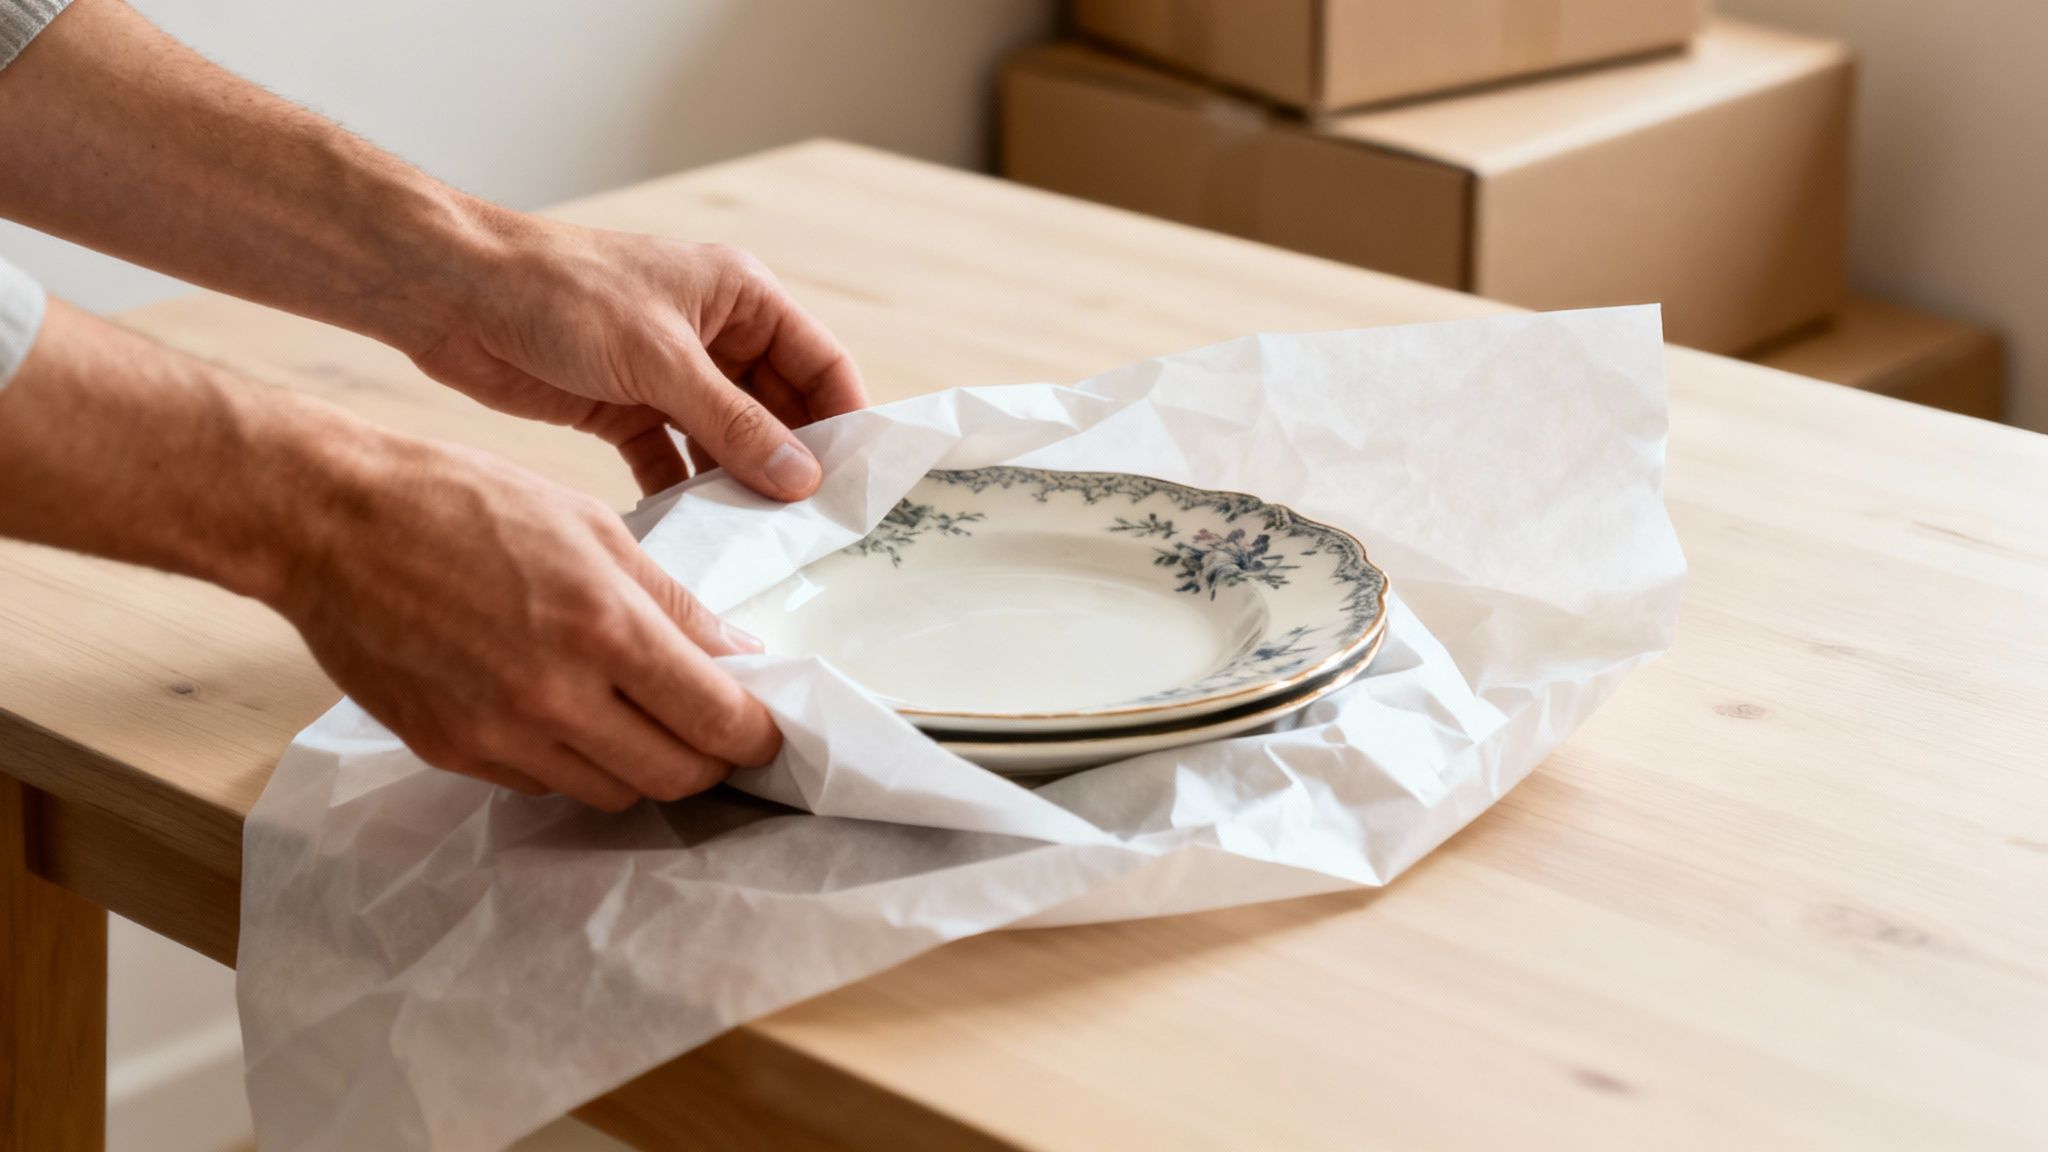
For Plates - The Nesting Technique:
Start by laying a single sheet of packing paper flat on your work surface. Place one plate in the centre and fold a corner of the paper over the top.
Now, place a second plate directly on top of the first and fold another corner over this second plate. Repeat this, stacking up to four plates and folding a new corner over each one. Once you have a stack of four, bring the remaining paper together and wrap the entire bundle securely. This 'nesting' method cushions each plate while keeping them tightly bundled.
For Glassware - The Stuff-and-Wrap Method:
This two-part technique is perfect for glasses, mugs, and stemware, protecting them from both internal and external pressure.
- Stuff: Gently crumple a half-sheet of packing paper and push it inside the glass. This simple step provides crucial internal support and stops the delicate rim from cracking under pressure.
- Wrap: Lay the stuffed glass on its side on a full sheet of paper. Roll it diagonally, tucking in the ends as you go, much like rolling a burrito.
A critical tip from the pros: always pack plates and bowls on their sides in the box, like records in a crate. Stacking them flat makes them far more susceptible to cracking from the weight of items above. Glasses, however, should always be placed upright.
Safeguarding Electronics and Awkward Items
Modern electronics and oddly shaped decor require a slightly different approach. Here, the goal is to protect sensitive surfaces and prevent smaller parts from being lost or damaged. For truly high-value items, you might want to look into professional packaging techniques used in commercial settings for maximum protection.
Screens and Surfaces
For items like computer monitors, tablets, or small TVs, lay a few sheets of clean packing paper directly over the screen. Secure the paper with a small piece of painter's tape, which won't leave any sticky residue behind. This creates a scratch-proof barrier before you add more substantial protection.
For more delicate electronics, many people choose to combine paper with an outer layer of bubble wrap for extra impact resistance. You can learn more about when to use bubble wrap for moving to create the ultimate protective layer.
Lamps and Ornaments
Awkwardly shaped items are a classic packing challenge, but they're easy enough to handle with a bit of a system.
- Lamps: Always disassemble them completely. Remove the lampshade and bulb, then wrap the base and the harp (the metal frame) separately in packing paper, paying special attention to cushioning the cord and plug. Lampshades are delicate and should always be packed alone in a box, with crumpled paper gently placed inside and around them for support.
- Ornaments: For delicate figurines or vases, use the same stuff-and-wrap method as you did for glasses. If the item is hollow, like a vase, be sure to stuff it with paper first before wrapping the outside. Each one should get its own individual wrapping before being placed in a well-padded box.
How Much Packing Paper Do You Actually Need?
Running out of supplies halfway through packing a room is one of the most common moving frustrations. It’s right up there with the pain of realising you’ve bought mountains of materials you’ll never use. Trying to guess how much moving packing paper you’ll need often feels like a shot in the dark, but it doesn’t have to.
With a little bit of straightforward thinking, you can get it just right, saving yourself time, money, and a last-minute dash to the shops.
The trick is to think about volume and fragility, not just the size of your house. A minimalist one-bedroom flat might need less paper than a three-bedroom home, but if that flat is filled with delicate ornaments and a huge glassware collection, your needs could be surprisingly high.
A good rule of thumb is to budget for one 5kg pack of packing paper for every 15-20 medium-sized moving boxes you plan to fill with fragile or semi-fragile items.
Estimating Paper Needs By Room
Start your count in the kitchen. It’s almost always the most paper-hungry room in any home, hands down. A standard kitchen in a two-bedroom house, for example, can easily swallow an entire 5kg pack of paper just for the dishes, glasses, mugs, and small appliances.
From there, think about your other high-priority areas:
- Living Room: Remember to account for picture frames, vases, lamps, and decorative bits and pieces. These oddly shaped items often demand a bit more paper to wrap them up securely.
- Bedrooms: Clothes don’t need wrapping, but what about bedside lamps, trinket boxes, perfume bottles, and any framed photos or art?
- Home Office: Electronics, desk organisers, and delicate stationery supplies will all need a protective layer before they go in a box.
The chart below gives a great visual idea of how different fragile items require different amounts of care and, therefore, different amounts of paper.
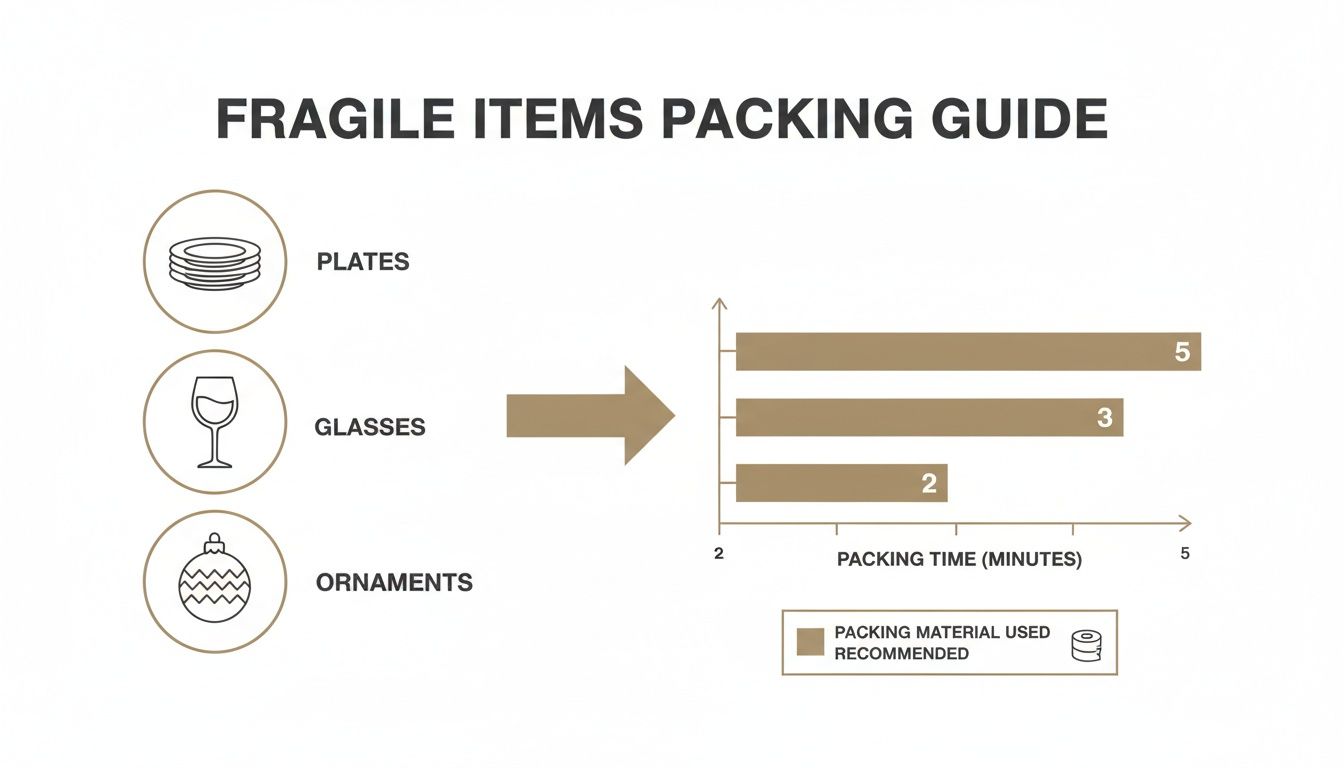
As you can see, while you can bundle plates together quite efficiently, items like glasses and ornaments need individual attention, which really increases how much paper you get through.
A Quick Way to Estimate Your Needs
To take the guesswork out of it, here’s a handy table to help you plan your shopping list. This guide gives you a solid, real-world estimate of what a typical UK home needs, helping you avoid that dreaded mid-pack supply run.
Estimated Packing Paper Needs by Room and Home Size
| Home Size / Room Type | Typical Number of Boxes | Recommended Packs of Packing Paper (Approx. 5kg pack) |
|---|---|---|
| 1-Bedroom Flat | 20–30 Boxes | 1 - 2 Packs |
| 2-Bedroom House | 30–50 Boxes | 2 - 3 Packs |
| 3-Bedroom House | 50–70 Boxes | 3 - 4 Packs |
| 4+ Bedroom House | 70–100+ Boxes | 4 - 6 Packs |
Remember, this is a starting point. If you’re a serious collector of delicate items or have a particularly large kitchen, always round up. It’s far better to have a little left over than to run out when you’re on a roll.
Simplifying Your Supply Run
Figuring things out room by room gives you a solid estimate. But if you want to remove the mental gymnastics entirely, a curated kit can be a brilliant solution. Many suppliers offer bundles tailored to the size of your home, making sure you get a balanced amount of everything you need in one go.
If in doubt, it’s always smart to buy slightly more than you think you’ll need. Running out of paper mid-pack is far more disruptive than having a small amount left over, which can easily be saved for the future or recycled.
Exploring pre-packaged house moving kits is a great way to streamline the entire process. These kits are put together based on the typical requirements for different property sizes, from a small flat to a large family home. They don’t just include moving packing paper but also the right mix of boxes, tape, and bubble wrap. It’s a practical way to get organised without the hassle of itemising every single supply yourself.
Combining Paper with Other Moving Supplies for Total Protection
While packing paper is incredibly versatile, it rarely works alone. The real secret to getting your belongings safely from A to B is to think like a professional mover and create a multi-layered defence system. By cleverly combining paper with other essential supplies, you can build a customised protective shield around everything you own.
Think of it this way: paper is your first line of defence, handling the scratches and scuffs. But other materials are brought in to deal with different threats, like impacts and pressure. They all work together as a team, offering complete security against the inevitable bumps and jolts of a house move.
Creating Strategic Packing Layers
For your most delicate items, a combination of materials isn't just a good idea; it's non-negotiable. Imagine you're packing something precious like a large ceramic vase or a games console.
- First Layer (Paper): Start by wrapping the entire item in several clean sheets of packing paper. This is what prevents surface scratches and provides a basic cushion. For the vase, remember to stuff the inside with crumpled paper to add crucial internal support.
- Second Layer (Bubble Wrap): Next, give it a generous layer of bubble wrap. This is your impact-absorption shield, protecting the item from direct hits and drops.
- Third Layer (Void Fill): Place your double-wrapped item inside a sturdy, double-wall box. Then, use more crumpled packing paper to fill any and all empty space. You want to make sure the item cannot shift or rattle around inside.
This layering method transforms a simple box into a secure cocoon for your valuables.
A common mistake I see is people relying on just one type of material. Using only bubble wrap can still allow for scratches if the item shifts inside, while using only paper offers very little protection against a heavy impact. The combination is what creates true peace of mind.
Assigning Roles to Your Packing Team
Every supply in your moving toolkit has a specific job to do. Knowing when to use each one is the key to packing both safely and efficiently.
Here are a few real-world examples:
- Removal Blankets: These are your best friends for large items like furniture and appliances. Always drape a blanket over a wooden bookcase or your washing machine before you even start moving it. This is your best defence against scratches and dents in tight hallways.
- Foam Corners: Absolutely perfect for picture frames, mirrors, and the corners of tabletops. They just slide right on, absorbing shock exactly where it’s most likely to happen.
- Double-Wall Boxes: These provide the structural integrity for your entire system. They are far less likely to crush when stacked, which is vital for protecting the carefully packed contents inside.
- Packing Tape: The final piece of the puzzle is a strong adhesive. Securely sealing your boxes with quality tape is what stops them from bursting open mid-transit. You can find a great selection of reliable packing tapes for moving that will keep all your protective layers locked in place.
Your Packing Timeline: The Secret to a Stress-Free Move
Let’s be honest, packing isn’t just about wrapping. It’s a project. And like any project, timing and strategy are everything. A good timeline is the difference between a calm, methodical pack and a frantic, last-minute scramble that leaves you feeling completely overwhelmed.
The single best piece of advice anyone can give you is to start early. It lets you tackle your home in logical, bite-sized chunks instead of facing a mountain of work right before moving day.
This is especially true during the chaos of peak moving season. For the last 13 years, August has consistently been the busiest month for UK house moves. In fact, projections for Friday, 29th August 2025, anticipate a staggering 22,386 moves in a single day, that's four times the daily average.
On hectic days like that, 85% of removal firms report delays, often caused by poor preparation like last-minute packing.. A solid plan is your best defence against becoming another delay statistic.
The Four-Week Countdown Plan
To stay ahead of the game, aim to start packing at least four weeks before you move. The trick is to begin with the rooms and items you use the least. This builds momentum without getting in the way of your day-to-day life.
- Four Weeks Out: Time to hit the deep storage areas. This is your moment to pack up the loft, garage, and any spare bedrooms. Box up seasonal stuff like Christmas decorations or out-of-season clothes. It's also the perfect opportunity for a ruthless declutter.
- Three Weeks Out: Now, move on to things you use, but not every day. Pack away your books, DVDs, most of your decorative ornaments, and any fine china or special-occasion glassware that you won’t need before the move.
- Two Weeks Out: This is when the real action begins. Systematically work your way through the main living areas and bedrooms, leaving out only what you’ll absolutely need for the next fortnight.
Pro Tip: Get Your 'Essentials Box' Ready
This is the very first box you'll open at your new home, and it’s a total lifesaver. Pack it with the kettle, tea bags, a couple of mugs, phone chargers, basic toiletries, a small tool kit, and any essential medications.
Your Final Week Checklist
The last seven days are all about tying up loose ends and getting ready for that first day in your new place.
- One Week Out: Finish packing the majority of your kitchen items, leaving just enough for basic meals. Now’s the time to defrost your freezer. Give your removal company a quick call to confirm all the arrangements.
- The Day Before: Pack up your bedding, towels, and the last of the kitchenware into clearly marked boxes. Double-check that your 'Essentials Box' is set aside and easily accessible. A good tip is to keep it in your car, not the removal van.
All your hard work preparing with quality moving packing papers and a clear timeline is about to pay off. You're ready for a smooth, organised move.
Sustainable Unpacking: Reuse and Recycling Your Paper
So, the last box is unpacked. Victory! But now you’re facing a mountain of used packing paper. While it’s tempting to just stuff it all into bin bags to get the job done, what you do next can make a real difference, not just for the planet but for your wallet too.
Most of that clean, ink-free packing paper you've used is 100% recyclable. Before you start, it’s always a good idea to quickly check your local council’s recycling guidelines, as the rules can vary from place to place. Generally, though, as long as the paper is clean, dry, and has all the packing tape stripped off, it can go straight into your household recycling.
Beyond the Recycling Bin: Creative Reuses
Hold on a second. Before you recycle everything, take a look at the pile. A lot of those sheets will be in perfect condition, ready for a second life. Reusing materials is an even greener choice than recycling because it doesn't require any energy to process.
Here are a few practical ways I've seen people give their leftover paper a new purpose:
- Future Shipments: This is the most obvious one. Flatten and store the best sheets. Next time you need to send a parcel or return an online order, you've got free, effective cushioning ready to go.
- Home Storage: Got seasonal decorations or delicate keepsakes? Crumpled paper is fantastic for filling the gaps in storage boxes, stopping things from shifting and getting damaged in the loft or garage.
- Crafts and Projects: Those large, clean sheets are a goldmine for kids’ art projects. They’re also brilliant for protecting tables during messy jobs or even as a rustic-looking gift wrap.
- Gardening and Compost: Uncoated brown or white packing paper is a gardener's friend. You can use it as a weed-suppressing mulch or shred it up and add it to your compost heap as a carbon-rich "brown" material to balance out your kitchen scraps.
Giving your packing supplies a second life is a cornerstone of a greener move. It transforms what could be single-use waste into a valuable resource, perfectly aligning with a more sustainable lifestyle.
Making Your Next Move Even Greener
Thinking about sustainability from the very start of your move can slash the amount of waste you produce. When you begin planning, think about how your choice of supplies impacts the environment. It's not just about reusing your paper; it's also about choosing robust, reusable boxes from the outset.
Pairing your repurposed paper with sturdy containers is a fantastic strategy. You can explore a great range of eco-friendly moving boxes that are built to last for multiple moves, not just one.
By adopting these habits and exploring broader sustainable packaging practices, you can turn the often-wasteful process of moving into a thoughtful, eco-conscious effort.
Ready to make your move smoother and more secure? At The Box Warehouse, we provide all the professional-grade moving supplies you need, from durable boxes to clean, reliable packing paper. Order your moving kits and supplies today!


